If you want to move your WordPress site to a new host, you might feel a bit intimidated by the work ahead of you. The transfer itself is a bit lengthy, and it might take you days to completely transfer your WordPress site to another hosting service, which might have an impact on your business. But there are ways to make this process less complicated and faster.
Moving an entire WordPress site could include something called maintenance mode. This means your website might not be online for some time. Also, some data might get lost along the way. If your website is gaining popularity and your current hosting service is not capable of following your success, it might be time to find a new home. Our guide will provide you with all the data you need to complete this move successfully and without any downtime.
5 Simple Steps to Move a WordPress Site to a New Host With Zero Downtime
Disclosure: Some of these are affiliate links, and at no additional cost, we may get paid if you buy something or take an action after clicking one of these.
Step 1: Create a Backup
Having a backup is very useful regardless of what you are trying to do. You will be saving all your data in case something goes wrong.
Also, you can fix a mistake the other way around because the backup provides you with endless options. Therefore, creating a backup should be the first thing you do if you want to migrate WordPress to new hosting.
The process is quite simple, and you can complete it without complications.
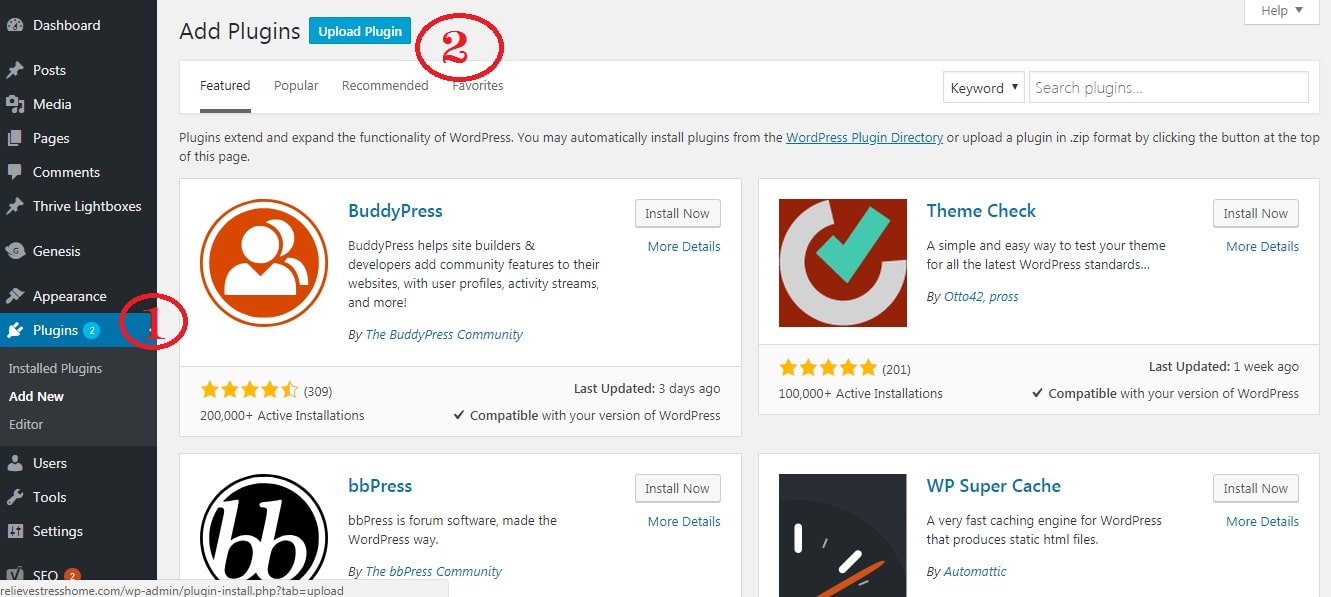
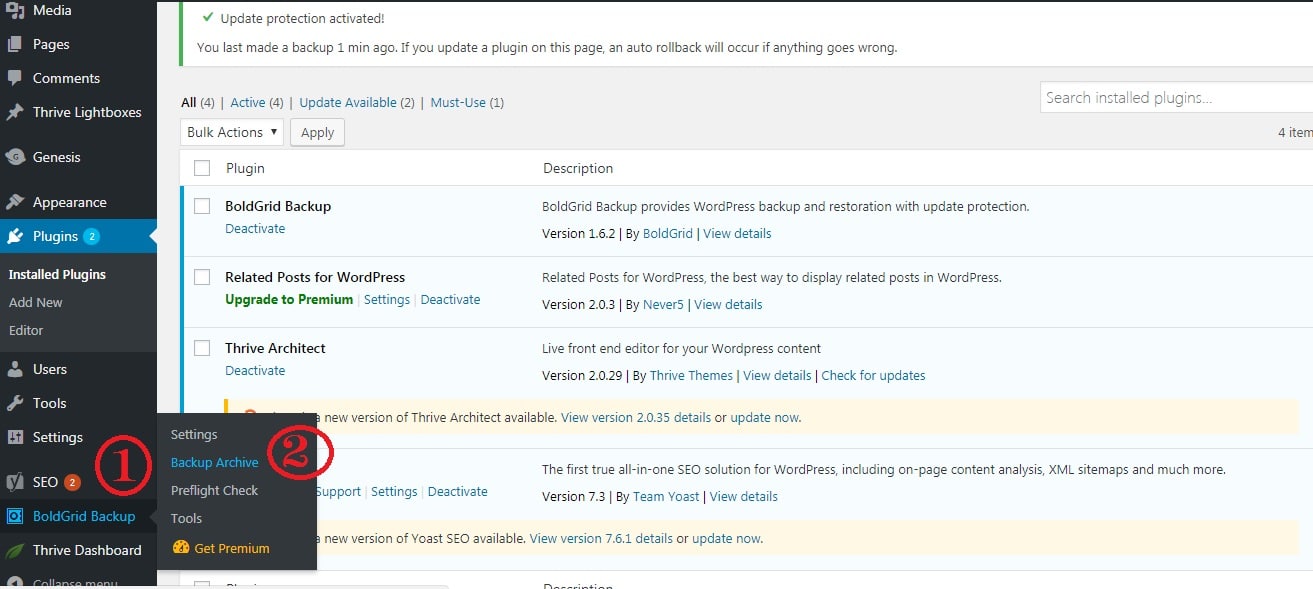
1.Go to your WordPress site and log in using your WordPress Admin account. Then go to BoldGrid Backup, download and save it to your hard drive. Once the download is complete, upload and install BoldGrid Backup plugin.


2. Find an option called Backup Archive and click on Backup Site Now. Your WordPress will back up automatically. Download the data to your computer as soon as the backup is finished.


Step 2: Install WordPress at the New Host
Once all your data is downloaded to your computer and the backup is secure, it is time to install WordPress at the new host of your choosing.
You are probably familiar with this step because you have used WordPress before, so it shouldn't be too complicated.
Find the hosting that will suit your needs. Make sure it has everything you require, and you will be able to migrate your WordPress there in no time. The process itself depends on the new host and its settings.
Step 3: Modify your Hosts File
If you are worried about downtime, which can happen every time you move hosts, a simple trick will keep your website accessible at all times, even when you are migrating your WordPress.
Keep in mind that your domain is still connected to the old host, so changing nameservers will result in possible downtime during the migration of your WordPress. However, you can access your website via your computer and your old website will remain intact. All you need to do is find the hosts file and make your computer believe that it is connecting to a particular IP.
This will give you permission to access all the files on the new hosting website through your current domain and see the migration process. Meanwhile, your audience will still be able to see your webpage through the same domain from your old host. Therefore, your website will be accessible at all times, and you will avoid errors with empty pages, which is very important to business websites.
How do you do this?
+ First, find the IP address of your new server. Simply log into your cPanel and find the Expand stats option. It is located in the left sidebar. Look for Shared IP Address and you will find the IP right next to it.
+Then run your Notepad as an administrator. This is a crucial step if you want to open your hosts file. It is a system file, and the only way to make changes to it is to run it as an admin. If you are unsure how to do this, enter 'notepad' into a search box on your computer and right-click on it once the program appears on your screen. Select Run as Administrator.
+Then locate your hosts file. The location might differ depending on the operating system you use, but you can find it at c:windowssystem32driversetc with Windows. The file is called hosts. Once you locate it, you must open the file.
+Go back to Notepad and click on File. Select Open. Keep in mind that Notepad will automatically list .txt files only. You must select All Files in the drop menu on the bottom. This will allow you to open any type of file in Notepad. Go to the location of your hosts file and open it in Notepad.
+Make your changes to the file. Copy the IP address you found earlier, paste it to the hosts file and save it. The IP should go before your domain. Once you complete this step, go back and see if it is working.
+Open your browser and type in your domain. The page should be a completely blank WordPress site. This means you copied and modified the correct part of the file. You are ready to move on with the migration. Meanwhile, your webpage at the old host will be available to everyone who wants to access it at any time.
Step 4: Restore your Backup
Now it is time to go back to your backup.
The first thing to do is to install BoldGrid Backup and restore the files. The speed of the upload will depend on the size of your file. As we have previously mentioned, moving to another host might take days depending on the amount of data you are transferring to another server. It is nothing to be concerned about because it is a common occurrence. The speed of your upload might decrease from time to time.
If the file is really large and you notice that the upload is not going as fast as you would like, try using FTP. This is a great way to transfer your files because it allows you to take all the data and move it straight to the folder.
You can also use a program called FileZilla, but you will need to work out the settings before you start. Editing the hostname, username and password is a must if you want to use this software. Then change the name of your BoldGrid backup and start uploading it to the correct address of your new hosting website. Simply follow the instructions provided and you will eventually reach the end. There are a couple of things you should go over before you start this, especially if you are uploading a large file via FTP. The migration does take some time, so it is better to start it off on the right foot. You will be asked to confirm that the backup itself is associated with the WordPress installation.
Make sure the files are all starting with boldgrid-backup. They should also be in a .zip format or the program will not recognize them. Once you get everything uploaded, it is time to restore the backup and bring your WordPress website to life on a new hosting service.
Everything should be up and running. However, if you experience any difficulties, you can always contact customer service and ask them to point out the error you might have made during the upload process. Most people working there will quickly find the problem and notify you in a matter of hours. You can even ask them to fix the error for you.
Step 5: Update Your Domain
If everything is working properly, you must assign your domain name to the website located on the new server. Simply switch the DNS nameservers. Some hosting providers offer domains for their users, and there is no need to change DNS nameservers. However, if your domain is registered at a website such as GoDaddy, you must do some work. Simply go to the hosting panel or dashboard and update the domain. If you can't find it, contact support and they will help you out.
Always remember that changing nameservers might take up to 24 hours, so don't panic if you see that your WordPress is still on the old hosting. You can always check the situation on websites such as HostingChecker, which provides the hosting information once you type in the address. However, the domain update shouldn't take more than a couple of minutes.
Resource
When I started my WordPress site, I decided to use Bluehost. It is an excellent hosting website that is very suitable for beginners, and it was just the thing I needed at that point. However, my WordPress website kept developing and gathering a larger audience. I realized it might be time to search for new hosting because the website had to be fast and user-friendly. After all, people rarely wait longer than a couple of seconds for a website to load.
This is when I discovered inMotion hosting, which looked like a hosting provider that could address all the issues I was having with my WordPress website and improve upon its performance. inMotion offered great speed, which was exactly what I needed. Its servers are very stable and crashes are rare, which is a huge plus. I also learned firsthand that its customer support is always there for you and can solve your problems quickly. In addition, they will provide you with well-written explanations about how to fix an issue, which is always appreciated.
Migrating a WordPress website can take days, but it is an excellent step to take if you want to make your website more successful. Investing in good hosting will pay off because your readers and visitors will enjoy spending time on your website. Of course, the hosting is not cheap, but if you have enough money, you can try inMotion and see how it goes.
Conclusion
Wanting to migrate WordPress to new hosting is a common thing, especially if your website is growing and you are getting more visitors. It will significantly speed up the performance and shorten the load time. The process shouldn't leave you without a website, though. You can keep your WordPress website online and experience zero downtime with a couple of easy tricks. This will ensure that your website is accessible at any point during the migration, which means your visitors will be able to access all the features like they normally would.
Once you move all the data to the new hosting provider, you can continue running your website just like you did before. The move to the new host will not be noticeable to your readers or clients.
I hope this guide has shown that keeping your website up is simple and extremely useful, especially for blogs, and that you can do it quickly without complications.
